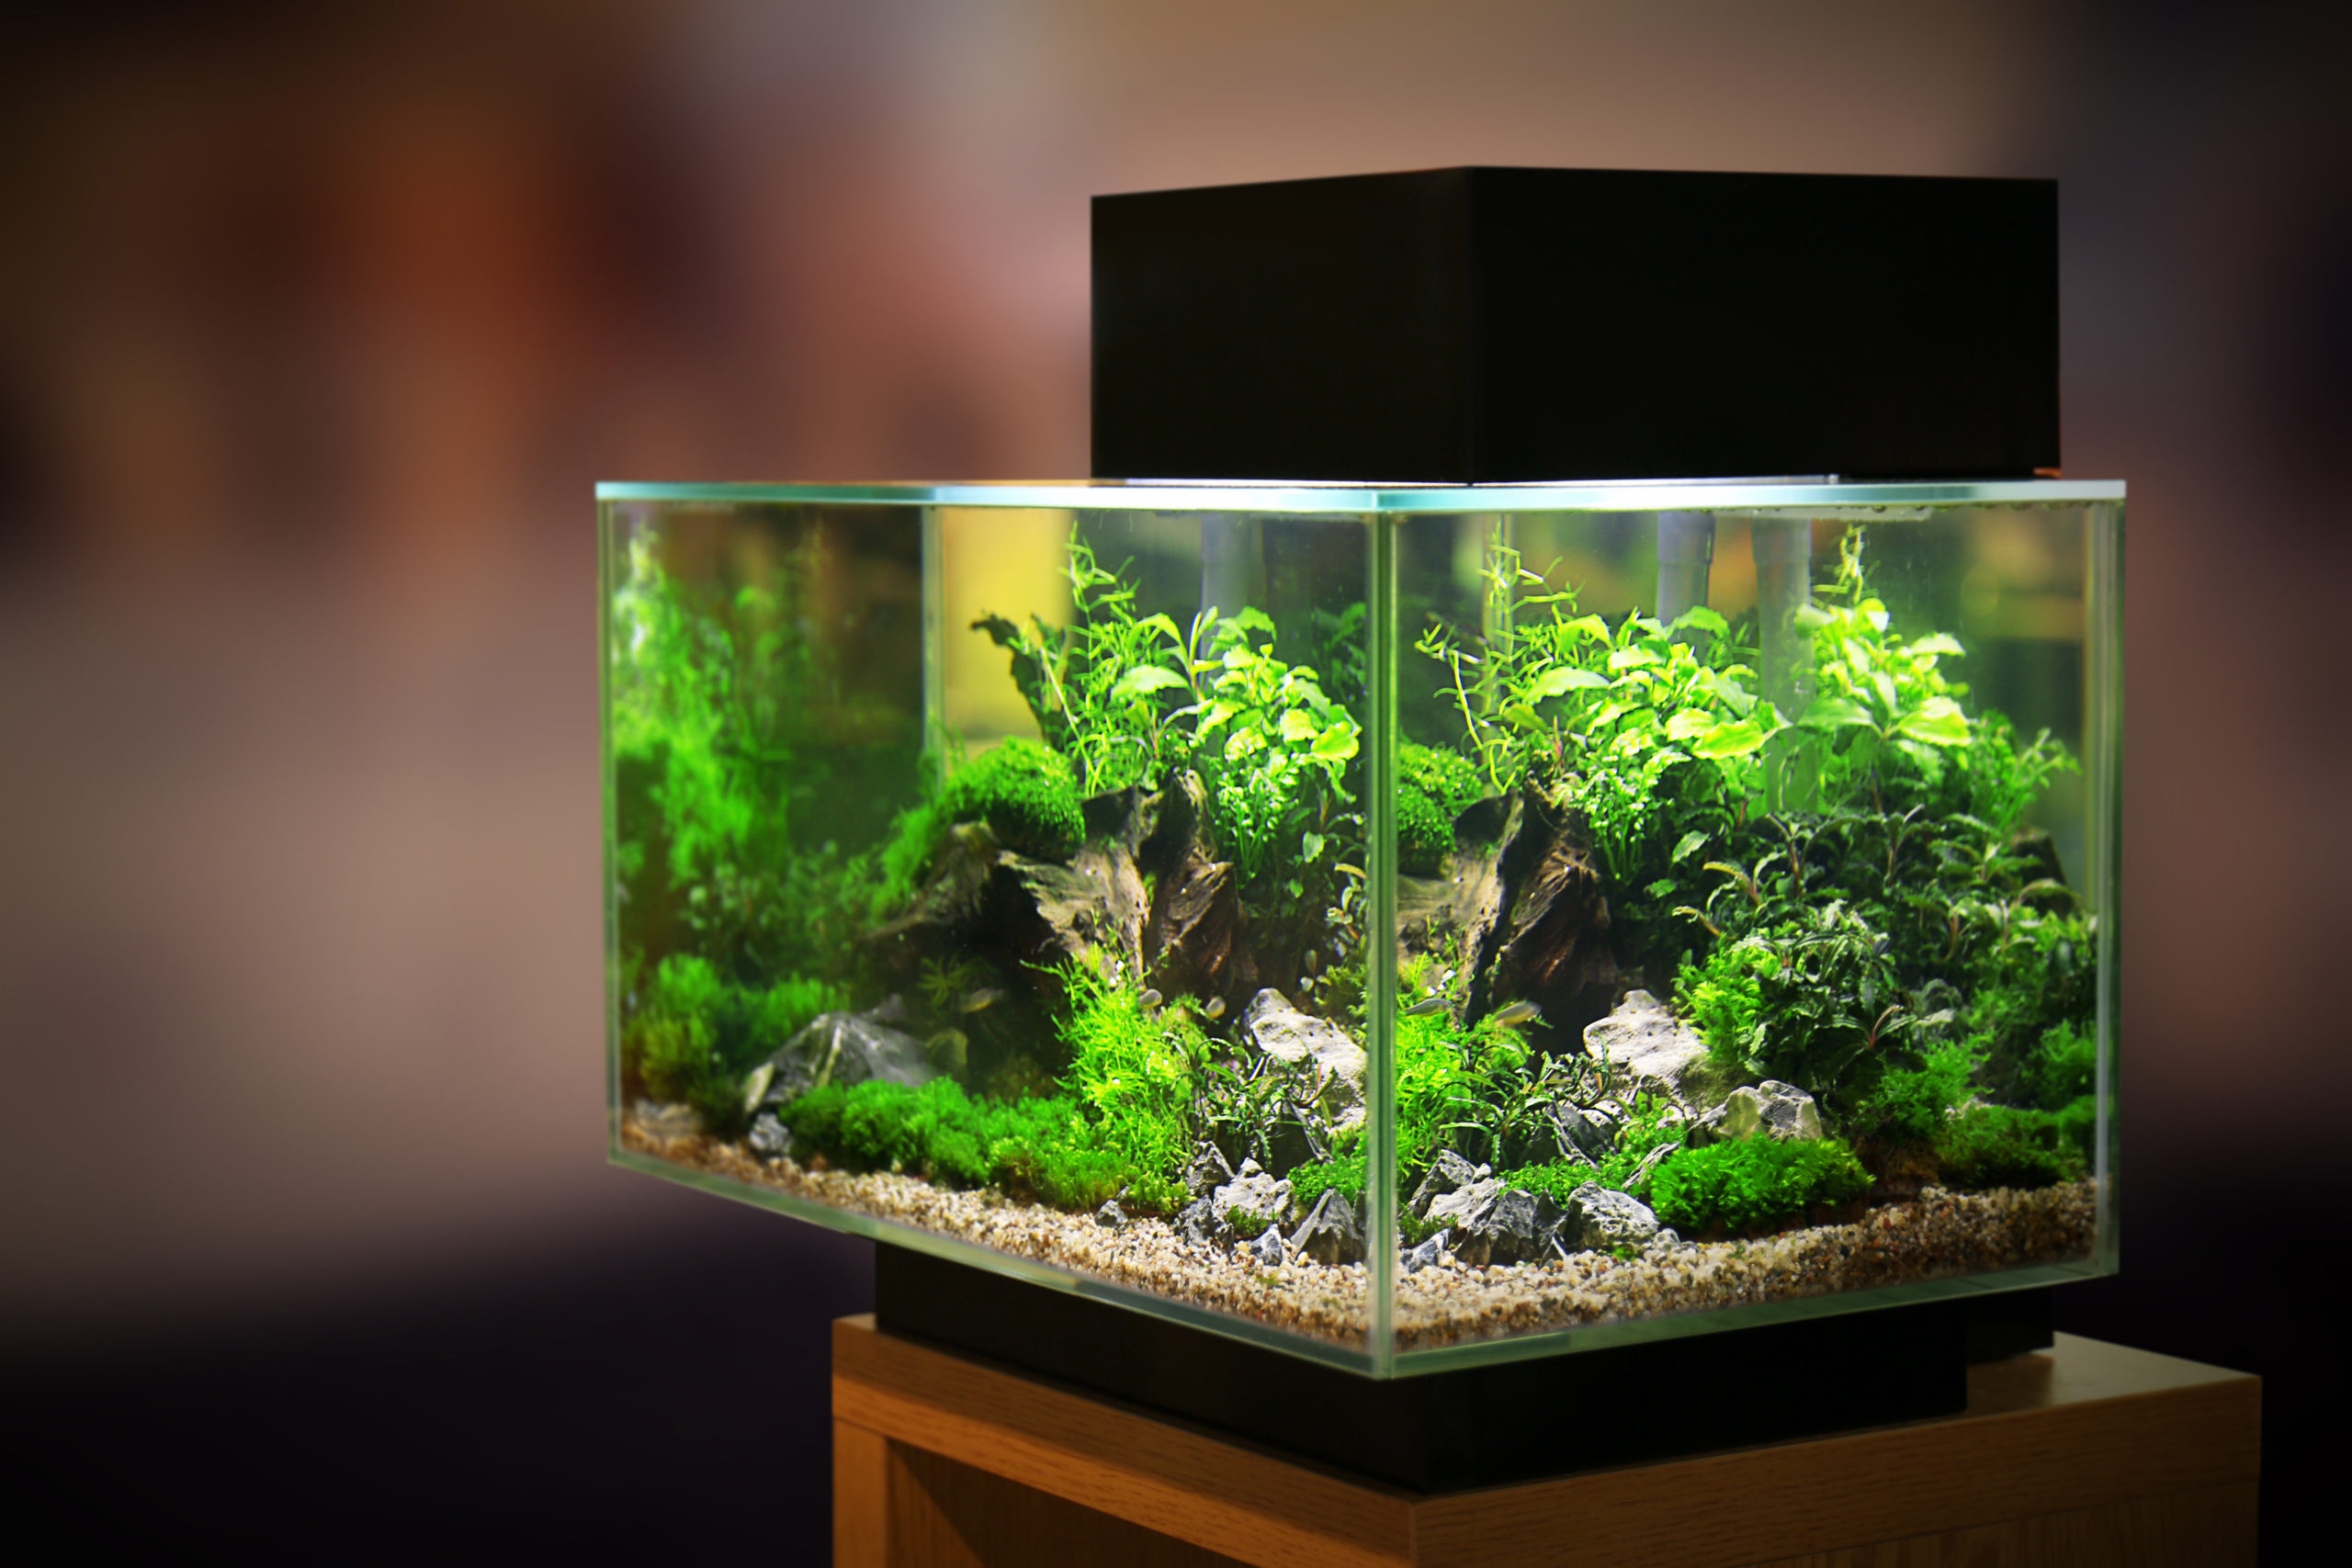
趣味でアクアリウムをやっていると、日々水槽の状態を把握しておきたい。例えば、温度やpHなどの量をモニタすることで飼育に適した環境であるか判断することができる。そこで、これらの量を監視できる装置を自作することにした。お金を出せばこのような装置を買うことはできると思うが、自作すること自体が楽しいので作ってみる。
装置の仕様決め
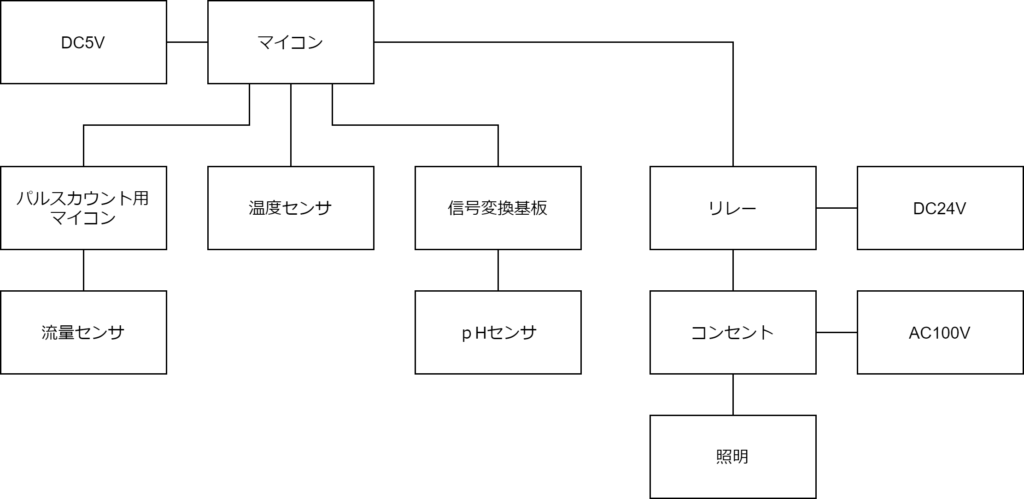
まず、装置の設計仕様についてまとめる。以下のような仕様を持つ装置を設計することにする。また、システムの構成は図1の通り。
- 温度のリアルタイム測定ができる。
- pHのリアルタイム測定ができる。
- ポンプの瞬時流量(L/min)のリアルタイム測定ができる。
- 温度、pH、流量をウェブブラウザ上に表示できる。
- 照明のタイマー制御ができる。
- 照明のON/OFFをウェブブラウザ上のボタンで行うことができる。
使用部品
無線LANを通じてブラウザ上から測定値を確認できるようにするためにWi-FiとBluetoothを搭載したマイコンであるESP32を中心に部品の選定をした。流量センサーは流量比例した周波数のパルスを出力する仕様なので、Arduino Nanoでパルスをカウントし、その値をシリアル通信でESP32に伝送する構成にしている。
- ESP32開発ボード(Amazonで購入)
- Arduino Nano(Amazonで購入)
- pHメーターモジュール(秋月電子:M-12547)
- 流量センサー(Amazonで購入)
- 防水温度センサーDS18B20(Amazonで購入)
- トランジスタ2SC1815Y(秋月電子:I-04268)
- 4.7kΩ抵抗 3個
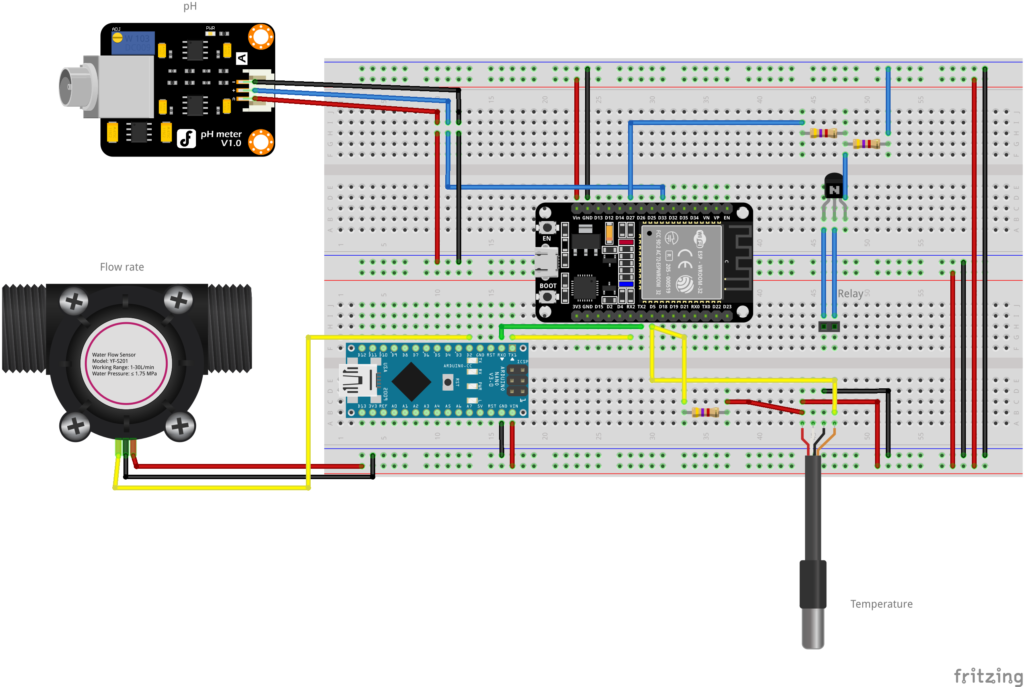
ハードウェア
試作品をブレッドボード上で組んだので図2に示す。
ソフトウェア
開発環境
- Windows10 Pro
- Arduino IDE 1.8.12
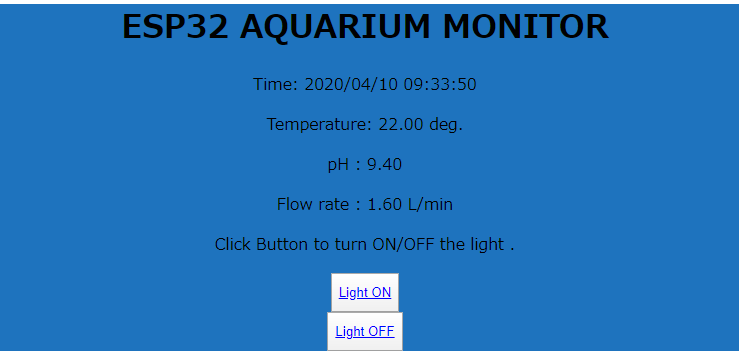
ソースコード
それっぽい動作をしたので実行結果画面(図3)とソースコードを貼り付けておく。pHの指示値はずれまくっているので要校正、流量センサの指示もあっているのか要確認。温度はアナログの温度計とほぼ同じ値を示していた。当方、電子工作やプログラミングは素人なので間違っていたらごめんなさい。内容の解説も別途記事を書きたいと思う。
#include <WiFi.h>
#include <WebServer.h>
#include <OneWire.h>          // 温度測定用
#include <DallasTemperature.h>// 温度センサ用ライブラリ

const char *ssid = "90324BE36274-2G";
const char *password = "2215007099700";
WebServer server(80);

String COLOR1 ="red";
String COLOR2 ="blue";
String COLOR3 ="lightgray";

//時刻取得に関する設定
struct tm timeInfo;     //時刻を格納するオブジェクト

//温度測定に関する設定
#define ONE_WIRE_BUS 5  // データ(黄)で使用するポート番号
#define SENSER_BIT 9    // 精度の設定bit
OneWire oneWire(ONE_WIRE_BUS);
DallasTemperature sensors(&oneWire);
float TempValue = 0;

//pH測定に関する設定
#define pHSensorPin 33   //pH meter Analog output to Arduino Analog Input 0
unsigned long int avgValue;  //Store the average value of the sensor feedback
float phValue;

//流量測定に関する設定
int num_pulse_diff;
float flow_rate = 0;

//リレー開閉信号
int LightONOFF = 27;//照明ON指令
int Relay2 = 26;
int Relay3 = 25;

//照明ON時刻設定
const int LightONHour = 07;
const int LightONMin = 30;
//照明OFF時刻設定
const int LightOFFHour = 18;
const int LightOFFMin = 00;

void handleRoot() {
  handleRootmsg(COLOR2,COLOR2);
}

void handleon() {
    digitalWrite(LightONOFF, HIGH); // GET /H turns the LED on
    handleRootmsg(COLOR1,COLOR3);
}

void handleoff() {
    digitalWrite(LightONOFF, LOW); // GET /L turns the LED off
    handleRootmsg(COLOR3,COLOR2);
}

void handleRootmsg( String cr1,String cr2) {
    getLocalTime(&timeInfo);//tmオブジェクトのtimeInfoに現在時刻を入れ込む
    temp_measure();
    pH_measure();
    flow_measure();

    String temp = "<!DOCTYPE html> \n<html lang=\"ja\">";
    char tempa[500];
    snprintf(tempa, 500,
    "<html>\
    <head>\
    <meta http-equiv='refresh' content='5;URL=./'/>\
    <div style=\"background-color:#1e73be\";\"backgroun-size 150px 600px\">\
    <title>AQUA MONITOR ESP32</title>\
    </head>\
        <body style=\"text-align:center\">\
        <h1>ESP32 AQUARIUM MONITOR</h1>\
            <p>Time: %04d/%02d/%02d %02d:%02d:%02d</p>\
            <p>Temperature: %8.2f deg.</p>\
            <p>pH         : %8.2f</p>\
            <p>Flow rate  : %8.2f L/min</p>",
           timeInfo.tm_year+1900, timeInfo.tm_mon+1,timeInfo.tm_mday,
           timeInfo.tm_hour, timeInfo.tm_min, timeInfo.tm_sec,
           TempValue, phValue, flow_rate
           );

    temp = tempa;
    temp += "<p>Click Button to turn ON/OFF ";
    temp += "the light </span>.</p>";
    temp += "<div>";
    temp +="<button type=\"button\" ><a href=\"/H\"style=\"color:" + cr1 + ";line-height:2.5\" > Light ON </a></button><br>";
    temp +="<button type=\"button\" ><a href=\"/L\"style=\"color:" + cr2 + ";line-height:2.5\" > Light OFF</a></button>";
    temp += "</div>";
    temp += "</body>";
    temp += "</html>";
    server.send(200, "text/HTML", temp);
}

void setup() {
    Serial.begin(115200);
    Serial2.begin(9600);
    sensors.setResolution(SENSER_BIT);//温度センサの精度設定
    pinMode(LightONOFF,OUTPUT);//照明ON/OFF指令

    WiFi.mode(WIFI_STA);
    WiFi.disconnect();

    delay(10);

    // We start by connecting to a WiFi network

    Serial.println();
    Serial.println();
    Serial.print("Connecting to ");
    Serial.println(ssid);

    WiFi.begin(ssid, password);

    while (WiFi.status() != WL_CONNECTED) {
        delay(500);
        Serial.print(".");
    }

    Serial.println("");
    Serial.println("WiFi connected.");
    Serial.println("IP address: ");
    Serial.println(WiFi.localIP());

    server.on("/", handleRoot);  // IPアドレスのみのアクセス時はhandleRoot()を起動
    server.on("/H", handleon);  // IPアドレス+/Hの時 handleon()関数の起動を設定
    server.on("/L", handleoff);  // IPアドレス+/Lの時 handleoff()関数の起動を設定
    server.begin();
    configTime(9 * 3600L, 0, "ntp.nict.jp", "time.google.com", "ntp.jst.mfeed.ad.jp");//NTPの設定
}

void loop(void) {
  server.handleClient();  // ブラウザへのアクセスに応じて適切な関数を起動処理する

  //照明タイマー制御
  if(timeInfo.tm_hour == LightONHour && timeInfo.tm_min == LightONMin){
    digitalWrite(LightONOFF,HIGH);
  }
  if(timeInfo.tm_hour == LightOFFHour && timeInfo.tm_min == LightOFFMin){
    digitalWrite(LightONOFF,LOW);
  }
}

void temp_measure(){//温度測定と表示
    sensors.requestTemperatures(); // 温度取得要求
    TempValue = sensors.getTempCByIndex(0);
  }

void pH_measure(){
  int buf[10]={0};
  int temp_pH=0;
  //pH測定と表示
    for(int i=0;i<10;i++)       //Get 10 sample value from the sensor for smooth the value
    {
      buf[i]=analogRead(pHSensorPin);//adc1_get_raw(ADC1_CHANNEL_5);
      delay(10);
    }
    for(int i=0;i<9;i++)        //sort the analog from small to large
    {
      for(int j=i+1;j<10;j++)
      {
        if(buf[i]>buf[j])
        {
          temp_pH=buf[i];
          buf[i]=buf[j];
          buf[j]=temp_pH;
        }
      }
    }
    avgValue=0;
    for(int i=2;i<8;i++)        //take the average value of 6 center sample
      avgValue+=buf[i];
    phValue=(float)avgValue*3.3/4096/6;
    phValue=3.5*phValue;       //convert the millivolt into pH value
    //Serial.println(analogRead(pHSensorPin));
}

void flow_measure(){
  //流量測定と表示
    if(Serial2.available()){
      if(Serial2.read()=='H'){
        num_pulse_diff = Serial2.read();
        }
      }
    flow_rate = num_pulse_diff / 7.5;
}
参考
- Webサーバに関する部分→作りながら学ぶArduino+=電子工作入門
- インターネットを通じた時刻合わせの部分→https://wak-tech.com/archives/833#i-2